To create a platform with centralized logging:
Initiate creation of Kublr platform. Example of how to do that can be found here.
In the DEPLOY FULL KUBLR PLATFORM dialog, click the FEATURES step.
Scroll to the Centralized Logging section.
Centralized Logging is always enabled when creating Platform.
Fill out count of master/client/data Elasticsearch nodes. In general, one data node is enough for 2-3 clusters created using Platform, but it depends on the number of logs generated by each cluster.
Note We highly recommend using Persistence enabled for collecting logs. Otherwise your custom templates and dashboards will be deleted after a restart of the Elasticsearch pod.

Complete creation of Kublr platform. Centralized Logging feature is installed on the Platform.
To open Kubernetes Dashboard, use the platform page, CLUSTER tab, Open Dashboard.

In Namespace, select “kublr”.
Open Pods page and check that all pods are running.
Note It may take up to 20 minutes for all pods to fully start. RabbitMQ and port-fwd may restart periodically.

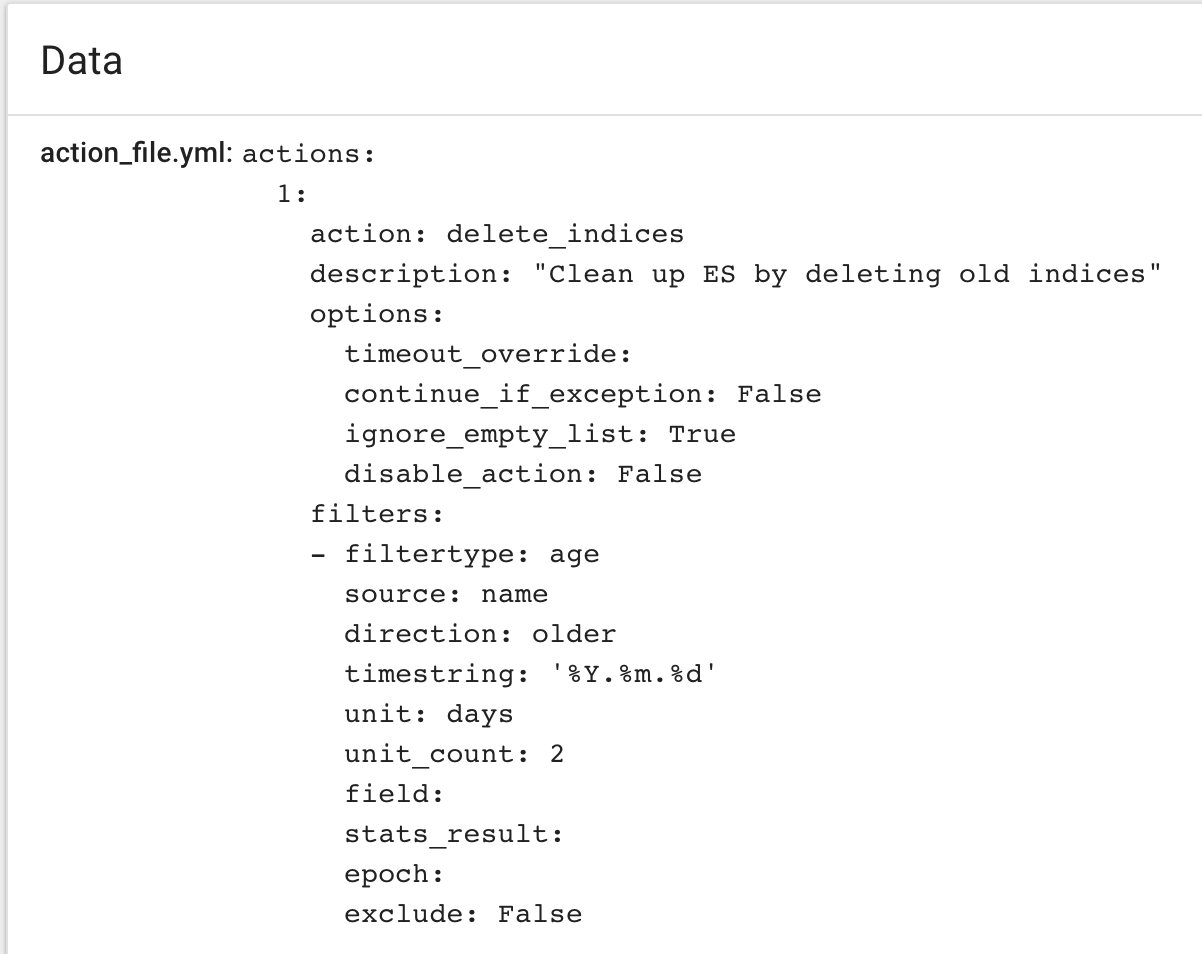
In the current implementation, logs will be collected for 2 days. If you want to collect logs for longer, follow the steps described in this article.
Centralized logging will be enabled in a managed cluster by default if centralized logging is enabled in the platform from which this cluster is created.
Centralized Logging is always enabled for your clusters. If you want additional logging for your cluster, follow the steps below:
Initiate creation of Kublr cluster. Example of how to do that can be found here.
In the ADD CLUSTER dialog, click the FEATURES step.
Select the Self-Hosted Logging checkbox.
Fill out count of master/client/data Elasticsearch nodes.
If necessary, select Persistence enabled, and then optionally type in Data node disk size.

Complete creation of Kublr cluster. Self-Hosted Logging feature is installed on the cluster.
While the cluster is created, go to the cluster page, the CLUSTER tab, scroll to the FEATURES section.
In the Logging field, click the link. The Kibana page is opened.
In Kibana, enter username/password from KubeConfig file.
The file can be downloaded from Kublr, the cluster page, CLUSTER tab.
In Kibana, create an Index Pattern.
To check logs, on the left menu, click Discover.

By default, the curator is configured to delete indexes older than 7 days. You can change this setting by specifying the retentionPeriodDays parameter in custom specifications. Here is an example for a platform:
spec:
  features:
    logging:
      sinks:
        -
          centralLogging:
            retentionPeriodDays: 30
Here is an example for a cluster with SelfHosted Elasticsearch:
spec:
  features:
    logging:
      sinks:
        -
          selfHosted:
            retentionPeriodDays: 30
To use custom specification click Customize Cluster Specification button instead of Confirm and Install when creating a platform or cluster.
Go to Config Maps. Open kublr-logging-curator-config. Click the Edit button and change unit_count from 7 to required value.
Note: You must independently calculate the resources necessary for your task and your environment.
See also: Kublr support portal: Customize Elastic Stack
In Kublr 1.21 and later X-Pack is enabled by default.
By default, centralized logging is preconfigured to use ELK without X-Pack. In Kublr 1.21 Kublr will be preconfigured to use with X-Pack.
To configure enabling of X-Pack in ELK, use custom cluster/platform specification to switch X-Pack (add overwritten values under “logging” section of custom spec):
    logging:
      values:
        elasticsearch:
           xpackEnabled: true
By default, centralized logging is preconfigured to use ELK without X-Pack.
If you want X-Pack installed, use custom cluster/platform specification to switch to images that includes X-Pack and set xpackEnable option equals true (add overwritten values under “logging” section of custom spec):
    logging:
      values:
        elasticsearch:
          cluster:
            xpackIncluded: true
        logstash:
          image:
            name: logstash/logstash
        searchguard:
          enabled: true
          elasticsearch:
            image:
              name: kublr/elasticsearch-sg
          kibana:
            image:
              name: kublr/kibana-sg
To use custom specifications, click the CUSTOMIZE SPECIFICATION button and set:

