Kublr uses Search Guard open source security plugin to provide multi-user access to Elasticsearch & Kibana.
As the Community Edition is used, we implemented a Kublr-own roles provisioning mechanism to Search Guard, as AD/LDAP/etc is available in Search Guard Enterprise Edition only. The Kublr administrator don’t need to do anything to configure roles in Search Guard configuration files, except for some complex custom cases.
By default, cetralized logging is preconfigured to use ELK with Search Guard.
To switch off Search Guard, please use following values in custom specification:
  features:
    logging:
      values:
        searchguard:
          enabled: false
Kublr manages Search Guard roles. As soon as a new cluster is created in some space, a new Search Guard role is created. In case when cluster is deleted and purged, kublr restricts access to those indices. This may cause the entire pattern to be restricted, please see the “Cluster Removed and Purged Case” section in the logging troubleshooting page.
A role is created per space. It means that all users who have ‘List’ access to some Kublr space resource, will have access to all logs of all clusters of that space.

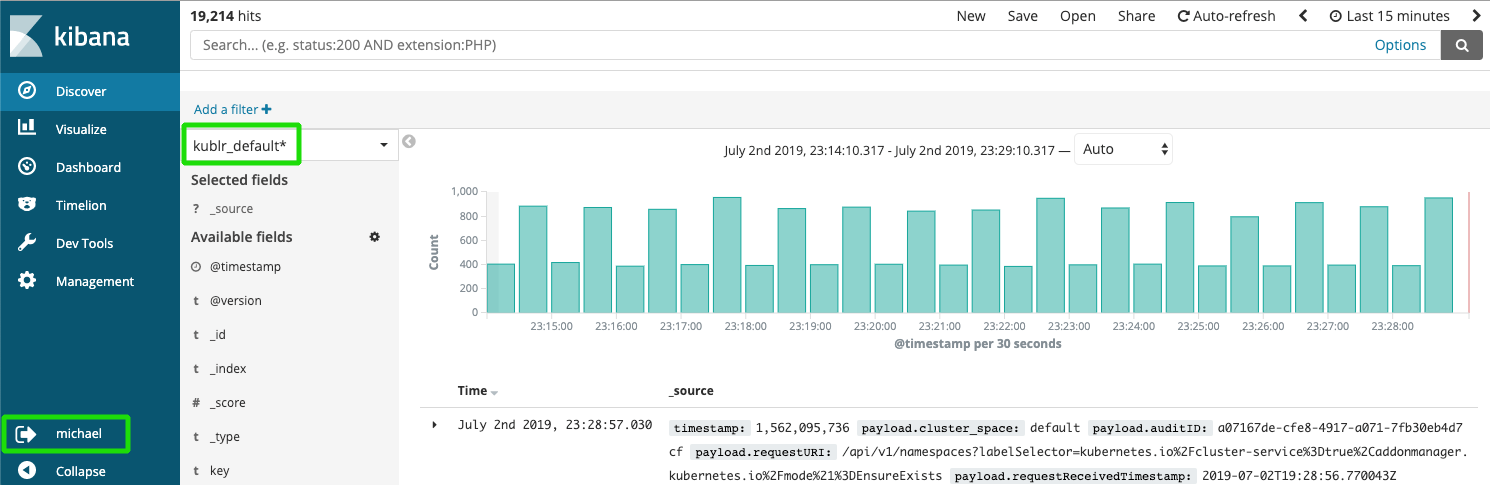
Kublr provides default index patterns for each created space. By default, there are kublr_default and kublr index patterns.
The first one can be used to see all logs of all clusters of ‘default’ space. The second one allows admin to get access to any logs, including logs of the Kublr platform cluster.
As Kibana multitenancy is part of the Enterprise edition of Search Guard, there is no way to hide kublr and other index patterns that cannot be accessed by user. But Search Guard restricts access on index layer and user will not get access to indexes that belong to other spaces:
At the same time a user is granted to see logs of clusters of spaces, they also have access to:
Kublr provides an automatic role mapping from what was specified in Kublr UI (Keycloack) via Search Guard to Kibana and Elasticsearch.
Usage example To provide a user with the administrator privileges in Kibana, it is enough to add the
adminrole for this user in Keycloak.
On a new cluster creation, Kublr adds the corresponding kublr:spaceName sections to the Search Guard roles mapping via the sg_roles_mapping.yaml file, for example the kublr:qa RBAC role is mapped with the Search Guard kublr:qa with:
  kublr:qa:
    backend_roles:
    - kublr:qa
Also the Search Guard role is added via the sg_roles.yaml file, for example:
    kublr:qa:
      index_permissions:
      - index_patterns:
        - 'kublr_qa_cluster1*'
        allowed_actions:
        - SGS_READ
Having this data, Search Guard transfers the roles to Kibana and Elasticsearch.
You can get information about current role mapping from the mentioned sg_roles_mapping.yaml and sg_roles.yaml files.
For Opensearch, the same configuration files are used - but without sg_ prefix in their names.
If it is necessary to specify permissions more narrowly, the administrator can modify the Search Guard configuration using the sgadmin utility. All necessary certificates are stored in the kublr-logging-searchguard secret of ‘kublr’ namespace of the platform cluster where centralized logging deployed.
There is a simple way to retrieve and apply Search Guard config using logging-controller pod:
$ kubectl exec -it -n kublr $(kubectl get pods -n kublr \
           -o=custom-columns=NAME:.metadata.name | grep logging-controller) /bin/bash
bash-4.4$ cd /home/centrolog
bash-4.4$ /opt/logging-controller/retrieve.sh
bash-4.4$ ls
sg_action_groups.yml   sg_config.yml  sg_internal_users.yml  sg_roles.yml  sg_roles_mapping.yml
#modify necessary files using vi
bash-4.4$ /opt/logging-controller/apply.sh
As Kublr manages space-based roles, do not use ‘kublr:’ prefix for your own roles. Please refer Search Guard documentation for guidance roles, roles mapping and other configurations.
Also, the additional information can be found on the logging troubleshooting page.
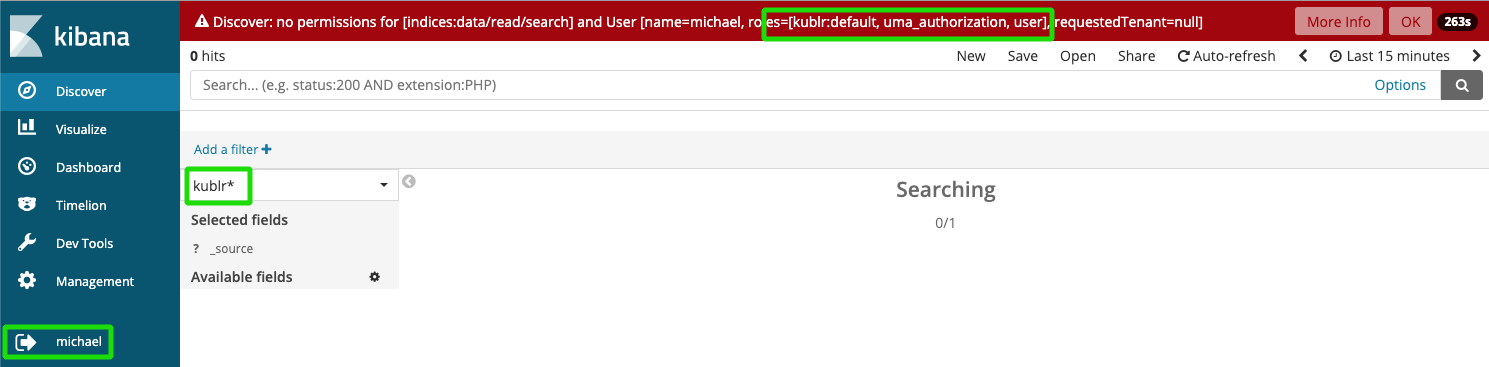
In case of misunderstanding the restrictions or access rights, it is possible to track the interaction of Kublr and Search Guard.
First of all, research kublr-logging-kibana pod, logs of sg-auth-proxy container. The following entry contains information about the user and their roles:
2019/07/02 18:27:00.809099 proxy.go:108: User '383f7ac8-8e32-4157-99c8-221c28fc1417':
          name=michael, roles=[uma_authorization user kublr:default]
Second, retrieve Search Guard configuration files, as described above.
If you’re unsure, what attributes are accessible you can always access the /_searchguard/authinfo endpoint to check. The endpoint will list all attribute names for the currently logged in user. You can use Kibana Dev Tools and request GET _searchguard/authinfo
By default Kublr logging configures full access to cluster logs for users who have Kublr access to the cluster. There are some situations where it may be too permissive.
The procedure disabling access to specific indices or index patterns is described in this article of the Kublr support portal:
The procedure for Search Guard custom object backup is described in this article of the Kublr support portal:
To activate the Hot-Warm-Cold mode, apply the following cluster specification values:
spec:
  features:
    logging:
      values:
        elasticsearch:
          hotWarmColdArchitecture:
            enabled: true
          nodeGroups:
            data: null
By default, Kublr preconfigured to use nodes resources as described:
| Node | Count | Mem Limit | Heap Size | Persistance Volume |
|---|---|---|---|---|
| master | 1 | 1024Mi | 512m | 4Gi |
| client | 1 | 2048Mi | 1280m | - |
| data | 1/0 | 4096Mi | 3072m | 128Gi |
| data-cold | 0/1 | 4096Mi | 3072m | 128Gi |
| data-hot | 0/1 | 4096Mi | 3072m | 32Gi |
| data-warm | 0/1 | 4096Mi | 3072m | 64Gi |
| Key name in specification | replicas | resources.limits.memory | heapSize | persistence.size |
To change resource, use custom specification values elasticsearch.nodeGroups.[nodeName].[key name in specification]. Example:
spec:
  features:
    logging:
      values:
        elasticsearch:
          xpackEnabled: true
          hotWarmColdArchitecture:
            enabled: true
          nodeGroups:
            data: null
            data-hot:
              resources:
                limits:
                  memory: "16Gi"
              heapSize: "12Gi"
            data-cold:
              persistence:
                size: "1024Gi"
              nodeSelector: {}
              tolerations: {}
              podAnnotations: {}
          curator:
            enabled: false
